13.4 Pitot/Static Remediation

This entry is part 59 of 67 in the series 13 - Electrical / Instruments

Prior to having the airworthiness inspection done, I was planning on getting the pitot/static/transponder check done. Friend and fellow builder Bob (who’s V-twin had a first flight 2 days after mine!) suggested checking the system for leaks prior to the check.

When I checked, it leaked like a sieve.  Couldn’t hold the altitude and airspeed for less than a second.  I pulled the panel (no small feat) and tightened all the fittings and still leaked. I isolated parts of the system and still had leaks. Spent a whole day trying to fix this and had to cancel the test, reassemble everything for the inspection, and come up with a plan B (actually, Plan A since the current system is a Plan B).

This brings us to our lesson for the day.  When learning to fly, you’re told that when a loss of power occurs, that you select a suitable landing spot (within gliding range) and stick with it!  Too often, as people descend, they see another spot that looks much better.  But when they try to make that spot, they run out of altitude. Now obviously, there are exceptions. But the idea of “Make a plan and stick to it” has merit.

This also applies to building. With the pitot/static plumbing, I researched all the different choices for tubing and fittings. What I decided on was “quick connect” system sold by SteinAir. I came across these when I was looking for a alternate static valve that had a toggle switch control.  The parts weren’t the cheapest (at least I thought), but it looked like a good choice.

Then someone told me that you can get “the exact” same type of fittings from Home Depot.  Early on, I made the decision not to use non-aviation parts unless I was absolutely certain that it either didn’t impact safety or that I could determine that the part was as good or better than the traditional aviation grade part. I could not make that determination with the Home Depot grade parts so that idea was dismissed.

Then I heard “Why are you going to use those fancy, expensive parts? Cessna, Piper, Beech have been using plain old NyloSeal parts for years and they work just fine.”  Well, I didn’t have a good answer for that. So I ordered a bunch of NyloSeal fittings and tubing from Aircraft Spruce. I mean, if it’s been working for everyone else, right?

Before ordering, I drew up a diagram:

Pitot-Static Diagram

Once all the parts were in, I hooked everything up and secured the fittings and tubing where necessary.

Here’s a picture after I installed the tubing and put the panel in place.  The arrows are pointing a various tubes and fittings.

2015-07-06 IMG_20140528_084725635

Not the prettiest installation, but it’s behind the panel and with all those fittings, there’s only so much you can do.

Once I discovered that the system was leaking and I couldn’t get it to not leak, I decided to go back to my original plan.

So I made up a new diagram. In the process, I decided to eliminate the “test points” in the system. I had asked the shop that’s been doing the pitot/static checks on the Cessna about what they like to see in a pitot/static system and he told me “test points so I don’t have to tap into a line.”  But it occurred to me that a single test point adds three connections to the system.  After I redesigned the system, for the new hardware, between eliminating the test points and having a 5-port manifolds, I reduced the number of connections from 44 to 28.

Old Pitot-StaticNew Pitot-Static

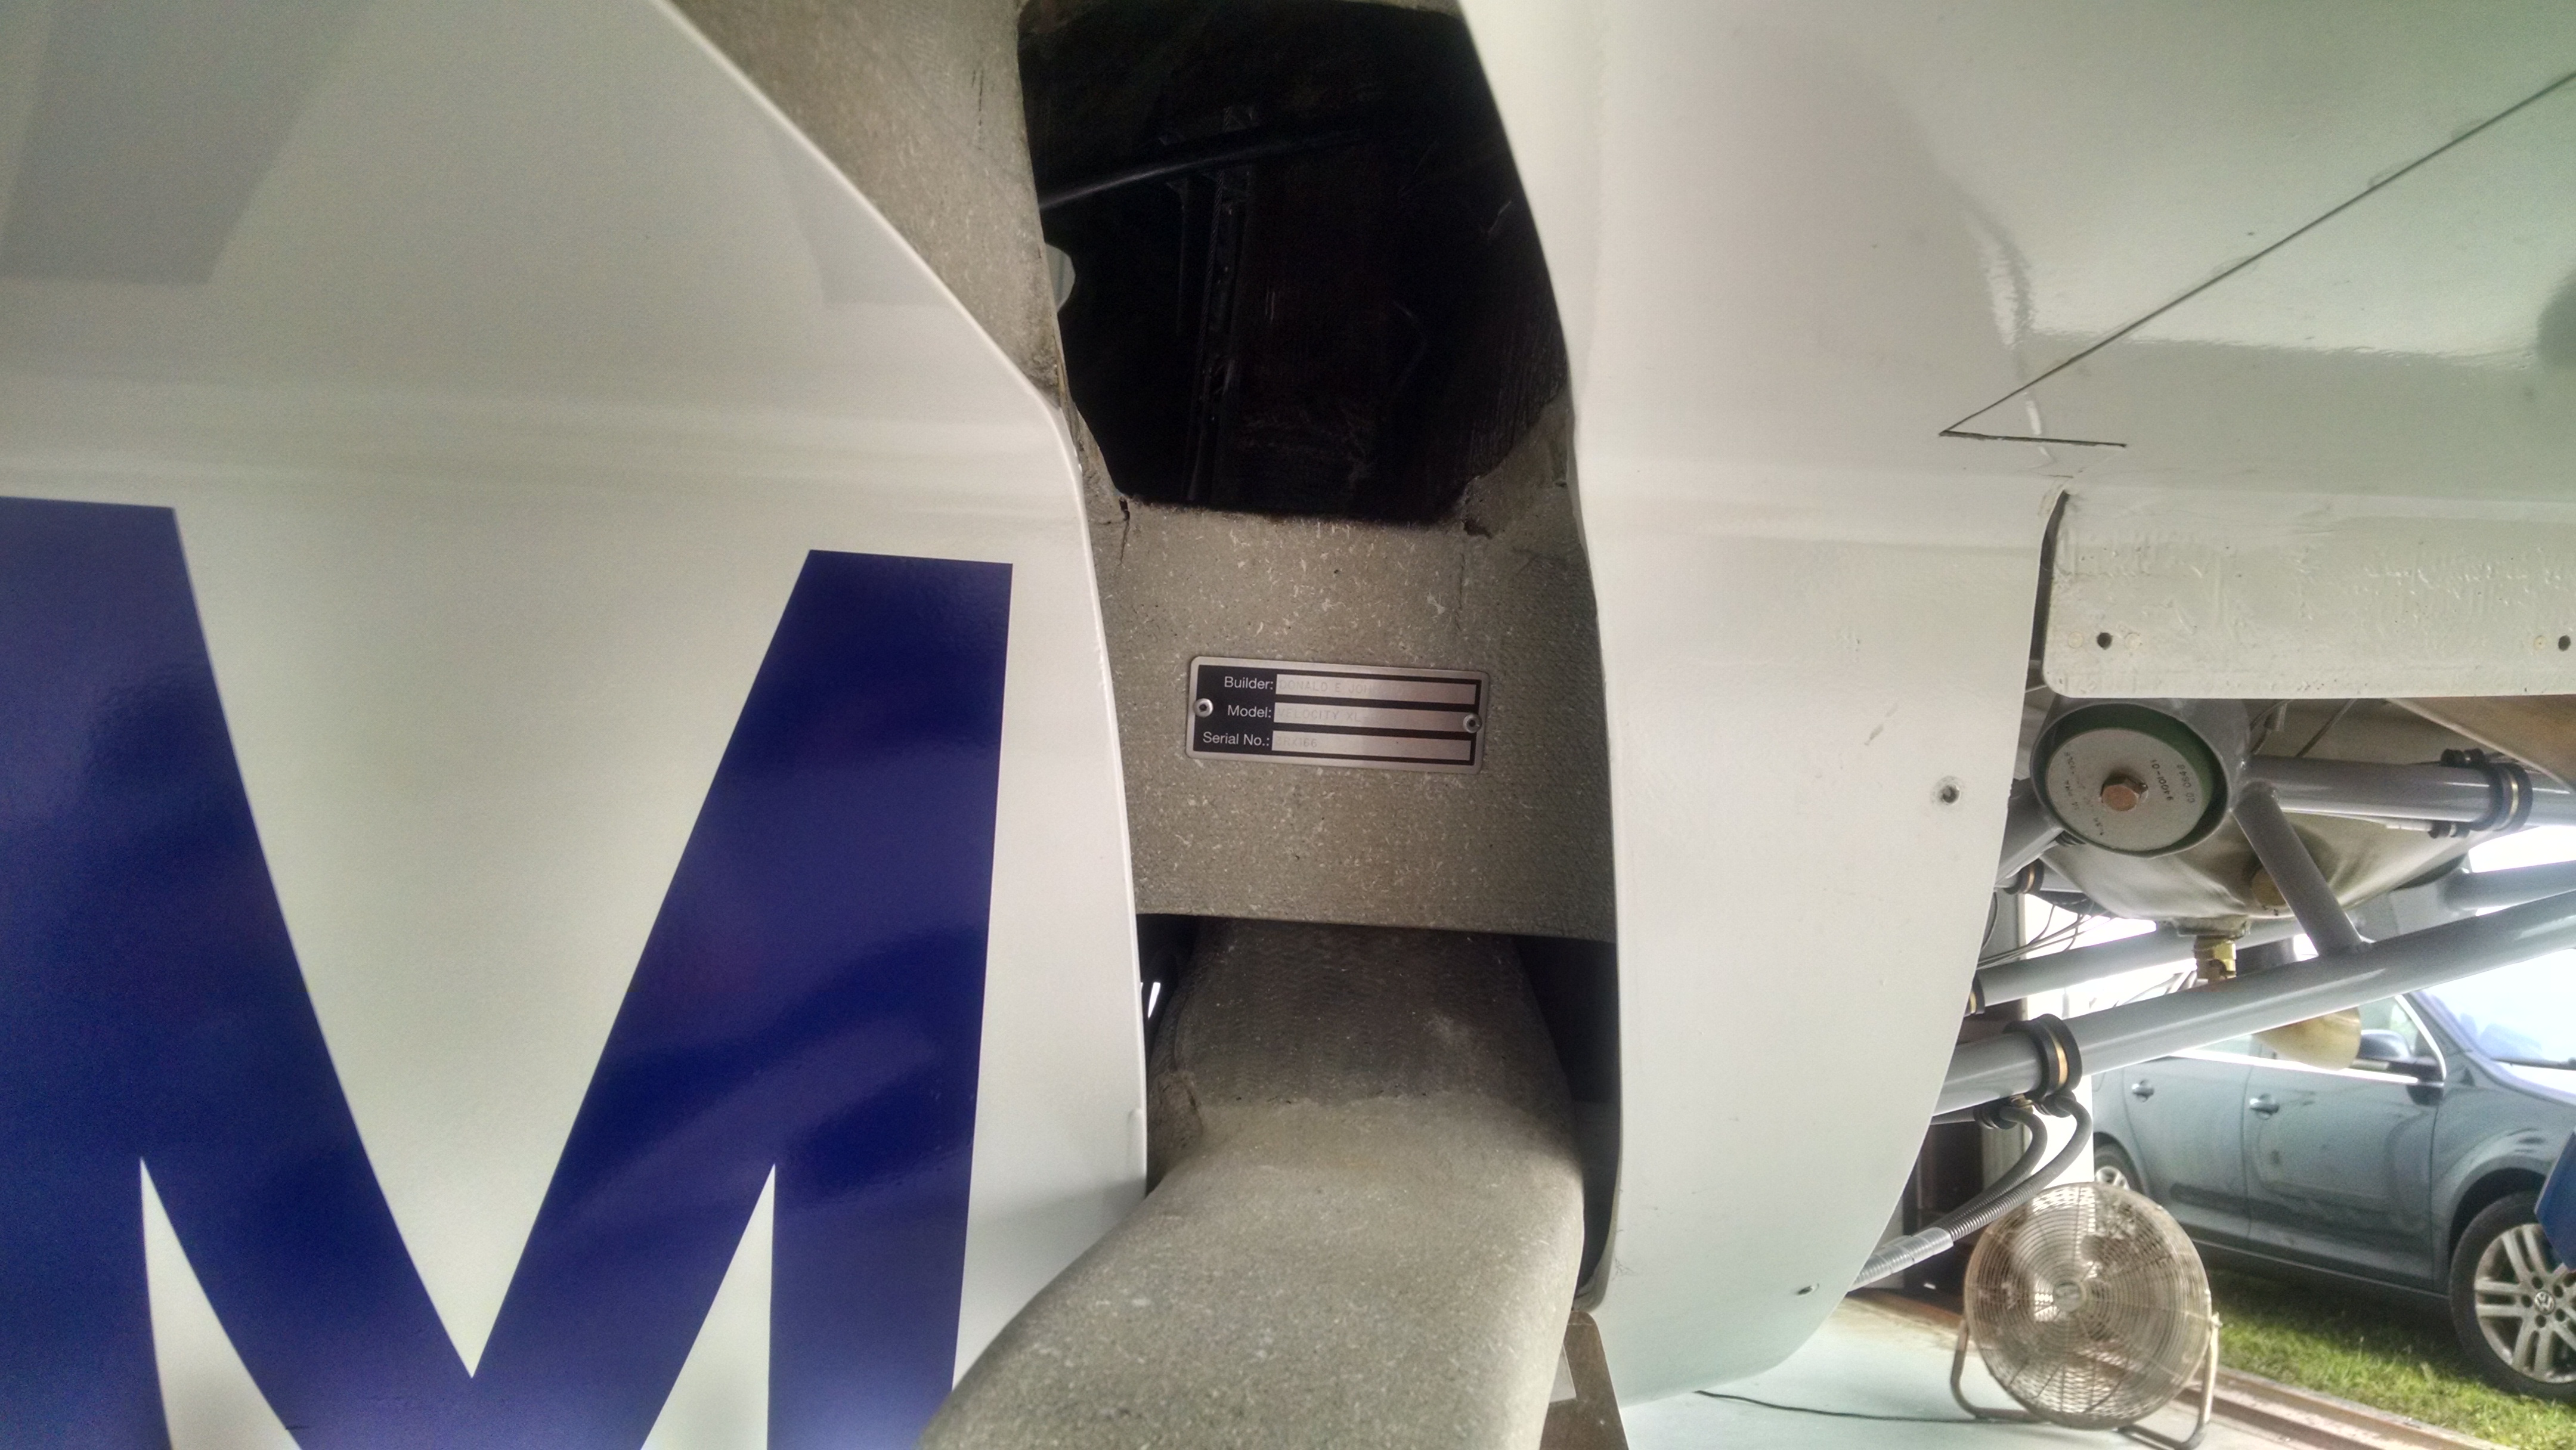
I also used the “banjo” elbows for attaching to the static ports on the sides of the fuselage. These fittings are very low profile which means that the interior trim will fit closer to the fuselage. Here’s a picture of a standard elbow (left) and the “banjo” elbow (right).  Oh yeah, another huge benefit is that both elbows are full 360 degree swivel.  Which means you don’t have to worry about “clocking” the fittings to get them pointed in the right direction.

2015-06-25 _20150625_143049(1)

The end result is a much neater installation that had no leaks. I also used red tubing for the pitot side and clear tubing for the static side to make it easier to identify the two different lines.

2015-07-06 IMG_20150706_081241770_HDR 2015-07-06 IMG_20150706_081249678_HDR

This is what I removed.

2015-07-07 IMG_20150707_120757151

14.99 Airworthiness Inspection

This entry is part 35 of 38 in the series 14 - Final Assembly / FInishing

Over the past 7 years, there have been many “milestones”.

Finishing all the filling and sanding and getting the plane in shiny white primer.

Hanging the engine.

2011-10-07 DSC_0071

Retracting the landing gear.

Powering up the electrical system.

2014-05-31 IMG_20140531_193001095 (Small)

Starting the engine.

2015-03-06 1633 Image0053

But those are all, what I would call, building milestones. They are events that I conside significant. There’s nothing that I’ve done which warrants the attention of the FAA.

That changed today.

This morning at 9am, the FAA DAR (Designated Airworthiness Representative), paid me a visit. First we went over the paperwork to make sure that everything was in order.

I had a momentary panic attack when he mentioned that my builders name (Donald E Johnston) and registered owner name (Johnston Donald E) were not the same. This isn’t a problem, but the data plate permanently attached to the fuselage MUST show the builders name. And I couldn’t remember what name I had engraved on the data plate. So I had to check and sure enough it was correct. Whew!

Once the paperwork was deemed correct, he began looking over the airplane. He asked to see a landing gear retraction so I jacked up the plane, retracted the gear and then lowered it. Then he looked over the electrical system. He asked who did the wiring. I said “That would be me.”  “All of it?, he asked. “Yes sir” was my response. I got a “Very nice” with an approving nod.  I get the feeling that this particular DAR doesn’t throw those comments around very often. Made me feel real good.

Then he wanted to see the electrical system powered up. Once all the screens were up, he wanted to see the nav and strobe lights function.

After that, he looked inside the nose and pointed to an oil fitting on the nose oil cooler and said: “It’s not required, but it would make this DAR happy if you were to put an indicator on that fitting so you would know if it rotates.” I pulled out a tube of torque seal and marked it as requested.

After that we sat for a while going over more paperwork. He explained that I would have a 25-hour phase I test period since I’m running a non-experimental, approved engine/prop combination. Otherwise, I would have a 40-hour phase I test period. During phase I test flights, no passengers can be carried and all flights have to be done relatively close to Sebastian. I got a pretty decent sized test area.

Phase I map

After that, she can come home with passengers.

Then I got a piece of paper seven years in the making.

_20150619_101342

10.1.3 Aerodynamic Trim (Sparrow Strainer)

This entry is part 11 of 11 in the series 10 - Control Sytem

With the airworthiness inspection in two days, I’m down to the final tasks. Not everything is required to be done for the inspection, but I would rather do things which aren’t required than not get a certificate because I missed something that was required.

The sparrow strainer is not a required item, but it’s something that needs to be done, so I’m doing it.

Using the same process as used to attach the vortilons, I marked the area where the sparrow strainer attaches. Then I masked off the area both on the elevator and mounting arms. A thin film of clear silicon adhesive is applied and then the strainer is pushed into position.

To keep it from slipping off I used a bunch of tape to hold it in position. Then I cleaned up the joint and put a nice radius on it.

2015-06-17 IMG_20150617_171334600

6.3.2 Seating modifications

This entry is part 39 of 42 in the series 06 - Fuselage

In preparation to doing the weight and balance, I need to get the seats in. The back seats I just put in the back. But I bolted down the front seats. That’s when I noticed something… With the co-pilot seat installed, it’s really difficult getting in and out of the back.  It’s doable, but not easy.

I think it’s because I mounted the seat pretty far aft on the bracket to give Ann some legroom (that girl has some long legs!).

So now the question is: How do I get that seat to move farther forward? Seemed easy to me.  Fit some seat rails that have more travel. The current ones have only about 6″ of front to rear travel.

I Googled, called, emailed every vendor I could find that makes seat rails. Zilch, nada, zip. Every single one that I found will only move about 7″ max.  I found this surprising since about every car I’ve driven for the past 20 years has seats that can move at least 12″.

At this point, I can only come up with two possible options.

1) Hit the auto salvage yards and see if I can find a low profile seat rail that will work.

2) Get a second seat rail and mount it between the seat and the bracket. That way the whole assembly can be moved forward and then the seat itself can be moved forward another 7″.

The good news is that it doesn’t have to be done right away since I’m the only one that will be in the plane for the first 25 hours and after that, there probably won’t be anyone in the back seats for a while.

14.99 Weight and Balance

This entry is part 34 of 38 in the series 14 - Final Assembly / FInishing

One of the final tasks before having the airplane inspected is to perform the weight and balance.

Before the airplane can be weighed there are a couple tasks that need to be performed.

First, anything that will be in the plane for flight has to be installed. No problem there. About the only thing that hasn’t been installed is the interior trim and that’s not “required for flight” and it’s not going in until after I flown off the required test flight hours anyway. But the spinner has never been installed so that has to be done.

2015-06-04 IMG_2053

Second, all usable fuel has to be removed. Arrgh!  Back over to the factory building to borrow a bunch of 5 gallon fuel cans and then siphon out the fuel.

Finally, rather precise measurements need to taken. On the Velocity, the datum point is the nose. This is a reference point that is used to identify where the weight is located. (on many single engine production aircraft, the datum point is the firewall). So I used a plumb-bob to mark the floor where the nose is. Then the distance to the center of the nose wheel axle and main gear axles is located. This is used to determine the balance part of the weight & balance which is then used to determine the CG (Center of Gravity).

Now it’s weighing time. The factory has digital scales so I borrowed them (being in Sebastian has it’s advantages).

To get the plane on the scales, I had to jack up the plane. But my (homemade) jacks didn’t have enough travel to clear the jacks so I had to raise the plane. put some wood under the wheel, lower the plane, adjust the jack and repeat (fortunately, only once). The nose was easy since all I had to do was lift it up by hand.

Checking the weight

2015-06-04 IMG_2055

And the verdict is:

2015-06-04 IMG_20150604_113345026_HDR

1,919 pounds.

Now there’s still fuel left in the strake tanks and sump. But that can be subtracted to give the true empty weight.

I was surprised at the weight on the nose. I was given to understand that around 80-90 pounds was typical and I’m at 102 pounds. If I had to guess, I would say the 24v battery and ground power receptacle are adding at least 6 pounds to the nose weight. And at least I’m not going to have to worry about hauling around bags of shot to keep the nose down when I’m not in it.

I took the weight and wheel dimensions over to the builder’s center where Rick used a spreadsheet to back out the usable fuel and calculate the CG (Center of Gravity).

N621CM W&B

12.99 Engine Woes

This entry is part 44 of 50 in the series 12 - Engine / Propeller

Since starting the engine for the first time, I’ve run into a bit of a problem.

It runs okay at higher idle speeds but it doesn’t want to run at speeds that the book says it should run at. When I first ran the engine, I couldn’t get it to run under about 1,200RPM. And I had to pull the mixture to about 1/2″ short of cutoff.

So I borrowed the fuel pressure gauges from the factory hooked them up.

2015-05-20 IMG_20150520_130951606

The engine manual says that at 600RPM the fuel pressure should be 8-10 PSI with the mixture full rich.  At 1,200RPM, I was seeing half that… and I had to have the mixture pulled out just to get that.

I increased the fuel pressure by a half turn and leaned the idle mixture by a half turn then ran the engine and checked the pressure. The pressure went up, the mixture didn’t have to be leaned as much and the engine could run at a little bit lower RPM.  Finally after FOUR turns on the pressure and and four turns on the idle mixture, I can run the engine at about 800RPM with the mixture full rich and a fuel pressure of about 11psi. If I go any further, the engine doesn’t run as well.

Since I was close, I decided to try a full power run.  The book shows full power being 2,700RPM.  But stationary on the ground I should only hit about 2,650RPM.  But when the throttle was pushed in all the way, 2,100RPM was as good as it got.

Clearly something is amiss.

I talked with Continental when I was at Sun-n-Fun and they suggested having a mechanic that’s familiar with Continental fuel systems look at it. But there isn’t one in Sebastian. The nearest one is in Sebring and he can’t make the two-hour drive over until the end of May.

I was talking with my A&P of many years and he said “Don’t pay anyone to look at the engine until you’ve had the fuel pump sent out and checked.”  And he was pretty adamant about it. I started looking for shops that do this work and the first one I hit basically said that since the engine has been sitting for four years the seals in the pump and manifold can dry out and get cracks which can cause some very strange behavior.

I pulled the fuel pump and fuel manifold (spider valve) and shipped them to Aircraft Accessories of Oklahoma.  Ken called me the day the parts arrived and said the fuel pump was “perfect”.  The only thing wrong was that the pressure was dialed up too high. I asked him if it was about four turns too high. He paused and said “uh… yeah. How did you know?” :-)) The manifold has a rubber diaphragm and it was “a little stiff” so it was replaced.

He said that I probably will never get a smooth idle at low RPMs because of the lightweight prop.  He also said the only other thing that could be wrong is the throttle body (fuel metering unit) and that if it didn’t run properly after reinstalling the parts that I should call him.

When the part arrived, I installed them and hoping for the best, fired up the engine… with the exact same results (low unmetered pressure, inability to idle at lower speeds and running very rich). I talked to a bunch of people and the consensus was that the metering unit was allowing too much fuel into the cylinders (making them run rich) which did not allow the pressure to build up (low pressure). So contrary to the official Continental Service Information Directive, I began adjusting the idle mixture by leaning it a half turn and running the engine.  The engine ran leaner, the pressure was higher and it was able to run at a slightly lower RPM.  Seems like the right track.

EIGHT TURNS later, the engine is idling at about 800RPM (a bit rough) with the mixture full rich and about 10.5psi unmetered pressure.  Well, I’ve been here before.

So then a full power run was done. The engine hit about 2,650RPM but then dropped to around 2,575.  Because the RPM dropped after peaking, it indicated the prop governor was now limiting the RPMs.  I backed out the prop governor and did another full power run and was able to maintain 2,650RPM.

That’s great… But the fuel pressure was very low for that power setting.

Now there’s an adjustment for this (high pressure adjustment).  But that adjustment will throw off the low pressure adjustment.

At this point, I’ve been fighting this since March.  I’ve spent about 18 days working on this and pretty much nothing else. It’s time to call in experts. Another builder had similar problems and called in Leading Edge Aviation from Tampa. I put a call into them and we made plans for Jonathan to meet at the plane.

When he came in to work on the other builder’s engine, he arrived at 9am and spent the day here.  But he told me that he’d arrive around 5pm!  I asked why and he said that it wouldn’t take very long (the other builder had a twin turbo-charged version of the engine). I was still surprised… and skeptical so I made sure that I had plenty of lights available.

So the day came but he was delayed a bit and ended up landing at around 6:15. He bought his own gauges and (small) handful of tools.  So we pulled out the plane and started it up. While he did get a pressure reading at 600 RPM, it was pretty ugly. He was working the throttle to keep the engine from stalling and he RPM was bouncing around so much that he would have to yell “NOW” whenever the engine touched 600RPM so his co-worker could read the pressure. Which needed tweaking along with the idle mixture. But not much.  At least I got that right.

Once that was set, we ran the engine up to full power and then the metered pressure needed adjustment… Which required quite a bit of adjusting. But that required going bach and adjusting the unmetered pressure and idle mixture adjustment. After only about an hour, it was finished!

Bob (another builder who’s building a twin) was on hand to observe pointed out “I told you that you should have called them two months ago.” And he did… And I should have. So I bought him dinner. Next time I’ll listen to Bob.

Time to begin taxi testing.

14.1.7 – Vortilon Installation

This entry is part 33 of 38 in the series 14 - Final Assembly / FInishing

I previously marked the location and alignment for the vortilons. Following Malcolm’s advice, I marked the outline of the vortilons and then masked the wing about a 1/4″ larger than the pad.  I also masked the top of the vortilons.  This will eliminate a lot of cleanup afterwards.

Then cleaned the wing and vortilons with alcohol. Next I applied a layer of clear silicon adhesive to the vortilon and placed it in position. Then I used more masking tape to hold them in position while the adhesive cured.

2015-04-21 IMG_20150508_100858855 2015-04-21 IMG_20150508_100915453 2015-04-21 IMG_20150508_100927621

16.1.1 Data Plate

This entry is part 1 of 7 in the series 16 - Flight Testing

While I was having all the switch panel overlays engraved by Aircraft Engravers, I also had them make my data plate.

Some builders put it on the outside of the fuselage but I put it on the transverse bulkhead.  It will be visible on the ground but not be on the fuselage skin.

2015-04-20 IMG_20150420_085422940_HDR2015-04-20 _20150420_085438

Hot!

I don’t know if it’s a heat wave, but I had to quit working early (around 1pm) and come in at 4am to avoid the worst. With no insulation and only one door, it got very uncomfortable in the afternoon.

2015-04-20 _20150420_073557

16.1.1 N-Numbers

This entry is part 2 of 7 in the series 16 - Flight Testing

Since I will initially being flying in primer and not paint, there is no reason to go to the trouble of painting on the registration numbers. So I looked for temporary N-numbers.  I looked at a couple of suppliers and found Ace Graphics. After exchanging a couple emails with Bruce I placed the order for Royal Blue, Semi Rounded numbers.  I chose royal blue because the propeller already has trim paint that looked like royal blue. The N-Numbers arrived while I was down working on the plane.

Before starting to apply them, I hit the area under the strake with some 1500 grit sandpaper to remove any overspray from when we painted the top half.

2015-04-18 MG_20150418_162737540

Once I had a nice smooth surface, I taped the N-numbers to the top of the area under the strake and then cut between each letter/number. Then it was just a matter of peeling the backing paper away and using a spreader to apply the numbers.

2015-04-18 IMG_20150418_165534165  2015-04-18 IMG_20150418_161437875